Abstract
Imagine that you need to make sure valuable cargo — like a robot or even human astronauts — can land safely on Mars. How would you do it? In this project, you will build your own model planetary lander using an Arduino. It will use a distance sensor and automatically deploy landing gear before impact. Can you avoid a crash landing?
Summary
Previous Arduino experience is recommended. See our How to Use an Arduino page for tutorials.
A kit is available from our partner Home Science Tools®. See the Materials section for details.
No issues
This publication was supported by an agreement with Cornell University, under Prime Agreement MCS2107‑23‑01 from the Department of Defense, Office of Local Defense Community Cooperation. Any opinions, findings, and conclusions or recommendations expressed in this publication are those of the author(s) and do not necessarily reflect the views of Cornell University nor those of Sponsor.

Objective
Design and build a model planetary lander with deployable landing gear.
Introduction
Humans have built spacecraft that have landed on a variety of celestial bodies in our solar system, including moons, planets, and even asteroids. These spacecraft can carry human astronauts, autonomous robots, or scientific payloads like equipment that measures the local atmosphere. Engineers have employed a variety of methods to land these valuable payloads safely, including retrorockets (rockets that fire to slow a vehicle down instead of speed it up), parachutes, airbags, and even hovering sky cranes that gently lower the payload to the surface (Figure 1)!
 Image Credit: NASA/JPL-Caltech / Public Domain
Most of these methods have something in common: they need to know the lander's altitude, or vertical distance from the ground. If you fire retrorockets too early or deploy a parachute too late, it may result in a crash landing that destroys the payload. Since other moons and planets do not have the same infrastructure we have here on Earth to pinpoint location - like cell towers and GPS satellites - the landers must rely on onboard electronic sensors to determine their altitude. Such sensors include radar and laser altimeters that send out a signal (an electromagnetic wave) down toward the surface and measure the amount of time it takes for the reflected signal to bounce back. If you know the speed at which the signal travels, you can then use this measured time to calculate the distance using the equation:
In this project, you will use an ultrasonic distance sensor which operates using a similar principle. Instead of electromagnetic waves, it emits a short burst of ultrasonic sound (sound that is too high-pitched for humans to hear). The sensor measures how long it takes for the sound wave to reflect back, and by measuring this time, it can calculate the distance. This is the same method that animals like bats use to find objects (like insects) without seeing them - also called sonar or echolocation.
You will use an Arduino for this project to both taking readings from the ultrasonic distance sensor and control servo motors that deploy landing gear. Watch the following two videos if you need to learn how to use these components with your Arduino.


Terms and Concepts
- Altitude
- Sensor
- Radar
- Laser altimeter
- Ultrasonic distance sensor
- Ultrasonic sound
- Sonar
- Echolocation
- Servo motor
Questions
- What are some methods that real spacecraft use to land safely on other planets?
- Why is it important for a spacecraft to know its altitude during descent?
- What are some ways you can slow your lander down during descent?
- How can you protect your lander during impact? How can the landing gear help?
Bibliography
- NASA (2024, August 7). Here's How Curiosity's Sky Crane Changed the Way NASA Explores Mars. Retrieved October 24, 2024
- Science Buddies staff (n.d.). Engineering Design Process. Retrieved October 24, 2024
- Finio, B. (n.d.). How to Use an Arduino. Retrieved October 24, 2024
Materials and Equipment 
Recommended Project Supplies
Note: this is an engineering design project, so the following materials list is just a suggestion. You can substitute or add other materials.
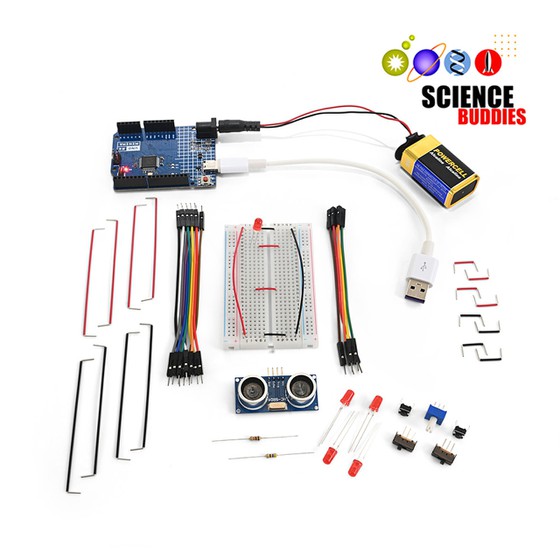
- Electronics Kit for Arduino, available from our partner Home Science Tools®. You will need the following parts from the kit:
- Arduino-compatible microcontroller board
- Breadboard
- Ultrasonic distance sensor
- 9V battery with snap connector
- Assorted jumper wires
- Additional circuit parts (must be purchased separately):
- SG90 micro servo motors (4)
- Male to male header pins
- Optional: 5.5.x2.1mm plug in-line power switch (allows you to turn your Arduino on and off without unplugging the battery)
- Windows or Mac computer. See this page if you have a Chromebook. Your computer will need:
- Access to the Arduino IDE, either installed local version or web-based editor. Watch this video for a comparison of the two options.
- USB port. The Science Buddies kit comes with a USB-A to C cable. The "C" end plugs into the Arduino and the "A" end plugs into your computer. You will need an adapter or different cable if your computer only has USB-C ports. Watch this video to learn about the different types of cables and adapters.
- Craft supplies to build your lander, such as:
- Cardboard box for the frame
- Popsicle sticks for legs/landing gear
- Tape and/or hot glue
- Scissors or hobby knife
- Materials to make a parachute, such as string and a plastic bag
Disclaimer: Science Buddies participates in affiliate programs with Home Science Tools®, Amazon.com, Carolina Biological, and Jameco Electronics. Proceeds from the affiliate programs help support Science Buddies, a 501(c)(3) public charity, and keep our resources free for everyone. Our top priority is student learning. If you have any comments (positive or negative) related to purchases you've made for science projects from recommendations on our site, please let us know. Write to us at scibuddy@sciencebuddies.org.
Experimental Procedure
In this procedure, you will first assemble your circuit and test your code. This makes it easier to identify and fix any problems with your circuit or code. After you have everything working, you will build your model lander, attach your Arduino and circuit, and conduct drop tests.
Assemble Your Circuit
Assemble your circuit as shown in Figures 2 and 3.
- Connect the Arduino's 5V and GND pins to the breadboard's positive (+) and negative (-) buses respectively.
- Connect the ultrasonic sensor:
- VCC pin to 5V
- Trig pin to Arduino pin 7
- Echo pin to Arduino pin 8
- GND pin to ground
- Connect the four servo motors:
- Ground (brown) wires to ground
- Power (red) wires to 5V
- Signal (orange) wires to Arduino pins 2, 3, 4, and 5
- Press the servo horns onto the servo motors, but do not screw them in place yet.
 Image Credit: Ben Finio / Science Buddies
 Image Credit: Ben Finio / Science Buddies
Test Your Code
- Download our ultrasonic lander example code. You can also access a Tinkercad Circuits simulation here.
- Read through the commented code so you understand how it works.
- Pay close attention to the
thresh,angle1, andangle2variables. You may need to adjust these variables later depending on your lander design. - Open the serial monitor in the Arduino IDE (Tools→Serial monitor).
- Move your hand back and forth in front of the ultrasonic sensor.
- Watch the output in the serial monitor. If the output does not change when you move your hand, double-check that your ultrasonic sensor is wired correctly.
- If the sensor has trouble detecting your hand, try using a large, flat object like a piece of cardboard instead.
- Do the servo motors move when you cross the threshold distance (100 cm in the example program)? If the servo motors do not move, double-check that none of your wires are loose.
Build Your Lander
Now that you have your circuit and code working, it is time to build and test a lander. You need to protect your valuable payload (your Arduino and circuit) from damage. Here are some things to consider for your design:
- Your lander needs to hold and protect your Arduino, breadboard, and 9V battery.
- The ultrasonic sensor needs an unobstructed view of the ground.
- The servo motors should be positioned to deploy landing gear (such as popsicle sticks glued to the servo horns) without getting snagged on any of the wires or parachute strings.
- You should try to slow your lander down as much as possible while it is still in the air. Parachutes and streamers, which add air resistance, are a good way to accomplish this.
- Your lander should have features that absorb some of the force upon impact. If you try to make a very stiff, rigid lander, it may just break when it hits the ground (and in turn, damage your Arduino). It is better to build some flexibility or springiness into the design of your lander to help absorb the impact.
- Consider the aerodynamic stability of your lander. You do not want your lander to tip over while falling and land on its side or upside-down.
- Remember that you can use an in-line barrel plug switch to turn your Arduino on and off instead of unplugging the battery, but this will add more weight.
- For many Arduino projects, you should not use a single 9V battery to power multiple motors since it will drain too quickly. However, since these motors only need to deploy once during landing, and you want to keep your lander as light as possible, it is OK to do so for this project.
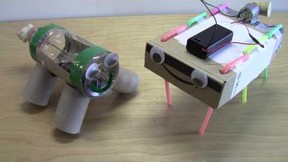
- Figures 4 and 5 show top and bottom views of a very basic lander design, but your design can be different.
- The electronics are all mounted on a flat, square piece of cardboard.
- The cardboard has two holes cut in it for the downward-facing ultrasonic sensor.
- The servo motors are attached to the four corners of the piece of cardboard, with popsicle sticks glued to the servo horns to act as landing gear.
- The servo horns are attached to the motors such that the popsicle sticks point straight up when the servo angle is set to 0, and straight down when the angle is set to 180. Depending on how you mount your servos, you may need to change the
angle1andangle2variables in the code. - A parachute made from a plastic bag is attached to the four corners of the lander with strings.
 Image Credit: Ben Finio / Science Buddies
 Image Credit: Ben Finio / Science Buddies
Test Your Lander
- Comment out the
Serial.beginandSerial.printlines in your code. These slow your program down, and you do not need them when your Arduino is no longer connected to your computer. You want your Arduino to react to changes in distance as quickly as possible. Re-upload the program to your Arduino. - Do not drop your lander yet! Test it by holding it (either by the frame or letting it dangle from the parachute) and moving it up and down with your hand. Make sure that the servo motors switch positions when you cross the threshold distance, and that nothing gets tangled in the wires or parachute lines.
- Figure out a safe place to do some initial drop tests of your lander. You may want to drop it onto a pillow or other very soft surface to start. Start with a low drop height (although note that if you start out too low, your parachute might not have time to fully deploy).
- Note: the ultrasonic sensor may not work as well on soft, porous surfaces since they do not reflect sound as well as hard surfaces. If needed, try placing something flat and smooth (like a piece of paper or posterboard) on top of the soft surface (like a pillow or grass) to help it reflect sound better.
- If possible, have someone use the slow-motion video mode on a phone to record your lander as it falls.
- Watch your lander fall, and if possible, review the slow-motion video. Based on your observations, think of possible ways to improve your design. Here are some suggestions:
- Do the legs fully deploy before the lander hits the ground? If not, how can you change the
threshvariable to make the legs deploy earlier? - Do the legs support the weight of the lander when it hits the ground? Do they slip out from under the lander, causing the servo motors to rotate backward? How could you potentially change the
angle1orangle2variables to affect this result? - How does the landing gear behave when it hits the ground? Can you modify the shape or materials used for the landing gear?
- What about the main body of your lander? Is it too flexible? Too rigid? How could you improve it?
- Is your lander going too fast when it hits the ground? How could you slow it down even more? What about a bigger parachute or multiple parachutes?
- Do the legs fully deploy before the lander hits the ground? If not, how can you change the
- Make improvements to your lander design and test it again. Continue to iterate and improve your design. Can you build a lander that reliably lands upright without breaking, tipping over, or crash-landing too hard?
Ask an Expert
Global Goals
The United Nations Sustainable Development Goals (UNSDGs) are a blueprint to achieve a better and more sustainable future for all.

Variations
- Can you add other outputs to your lander like LEDs or buzzers?
- Can you add motors with propellers to your lander to help actively slow it down as it descends? Note that unlike building a drone, the motors do not have to be powerful enough to lift the whole lander, just slow it down. However, motors that spin continuously may require a separate battery.
- Can you add an accelerometer to your lander to measure its orientation as it falls?
Careers
If you like this project, you might enjoy exploring these related careers:


Contact Us
Our kits are developed in partnership with Home Science Tools®. If you have purchased a kit for this project, Home Science Tools® is pleased to answer any questions.In your email, please follow these instructions:
- Include your Home Science Tools® order number.
- Please describe how you need help as thoroughly as possible:
Examples
Good Question I'm trying to do Experimental Procedure step #5, "Scrape the insulation from the wire. . ." How do I know when I've scraped enough?
Good Question I'm at Experimental Procedure step #7, "Move the magnet back and forth . . ." and the LED is not lighting up.
Bad Question I don't understand the instructions. Help!
Good Question I am purchasing my materials. Can I substitute a 1N34 diode for the 1N25 diode called for in the material list?
Bad Question Can I use a different part?
Contact Support
Related Links
- Science Fair Project Guide
- Other Ideas Like This
- Space Exploration Project Ideas
- Robotics Project Ideas
- Electricity & Electronics Project Ideas
- My Favorites
- Try this project with a micro:bit instead - the micro:bit is easier to program for beginners.