Algae String Chemistry and Design
Summary


Overview
These lessons use open-ended exploration to introduce students to biopolymers and the chemistry behind cross-linking. Students will draw inspiration from biology and use authentic scientific practices to design and create colorful string creations from a natural polymer, alginate.
Learning Objectives
Students will:
- Engage in authentic science practices through open-ended exploration.
- Create a string using polymers harvested from living algae.
- Manipulate the properties of a polymer using a chemical reaction
NGSS Alignment
This lesson helps students prepare for these Next Generation Science Standards Performance Expectations:- MS PS1-1. Develop models to describe the atomic composition of simple molecules and extended structures.
- Developing and Using Models
- Structure and Properties of Matter
- Scale Proportion and Quantity
- MS PS1-2. Analyze and interpret data on the properties of substances before and after the substances interact to determine if a chemical reaction has occurred.
- Analyzing and Interpreting Data
- Structure and Properties of Matter/Chemical Reactions
- Patterns
- MS PS1-3. Gather and make sense of information to describe that synthetic materials come from natural resources and impact society.
- Obtaining, Evaluating and Communicating Information
- Structure and Properties of Matter/Chemical Reactions
- Structure and Function
Materials
Science Buddies' Spherification Kit contains the sodium alginate and calcium chloride needed to do this experiment. The Tech is not associated with Science Buddies' kits.
Do not eat the resulting algae string; this activity was not designed with consumption in mind.
For a class (32 students in groups of 4 students) with each student making one batch of string:
| Materials: Lesson One | ||
|---|---|---|
| Materials | Quantity | |
| Essential Ingredients | Powdered sodium alginate
Food grade versions can be found online or at specialty grocery stores or pharmacies |
1 cup (250g) Per group: 4 tsp |
| Bottled or filtered water | 1 gallon Per group: 2 cups | |
| Exploration Supplies | Texture ingredients (Choose at least three)
|
32 oz, each |
Color sources (Choose at least two)
|
1 pack or set of colors, per type | |
| Tools | Permanent markers | 1 per group |
| Measuring cup | 1 per group | |
| Supplies container | 1 per group | |
| Measuring spoons (tsp and tbsp) | 1 per student | |
| Sandwich-sized plastic bags (sealable) | 1 per student | |
| Writing utensil | 1 per student | |
| Student handouts (Algae String Protocol) and (Data Collection Sheet) | 1 per student | |
| Materials: Lesson Two | ||
|---|---|---|
| Materials | Quantity | |
| Essential Ingredients | Calcium chloride (solid)*
Food grade versions can be found online or at brewing supply stores. |
1/2 cup (250g)
Per group: 2 tsp |
| Water (any kind) | 1 gallon
Per group: 2 cups |
|
| Tools | Containers for calcium baths
Should hold at least 2 cups (437mL) of liquid. Containers with wide openings that students can reach into work best. |
1 per group |
| Scissors | 1 per group | |
| Fans (optional) | 2-3 per class | |
| Drying line (optional) | 1 per class | |
Background Information for Teachers
Pedagogy and Approach
The primary goal of activities from The Tech's Biotinkering Lab is to create meaningful opportunities for students to experience science as a creative and personally empowering process. Algae String can be used to introduce students to key scientific concepts in the context of open-ended exploration and hands-on tinkering with biological components. Structuring science experiences this way can help students develop confidence, persistence and a positive STEM identity.
Science
Polymers are long molecules made of repeating subunits that are connected to each other by a chemical bond. They can either be natural or synthetic (human-made). Some examples of common natural polymers that humans have used for thousands of years include cellulose, natural rubber, starch and wool. In the last century, the manufacturing of synthetic polymers has become commonplace and these new polymers have replaced many natural polymers. Today, products made from synthetic polymers can be found all around us and include things like plastic bags, Styrofoam cups, nylon or polyester clothing, epoxy glue and Teflon-coated cookware.
Algae string is made using a natural biopolymer (made in a living thing) called alginate, which is extracted from brown algae, such as seaweed and kelp. In algae, alginate helps provide both structural strength and flexibility. The process of harvesting alginate separates it into individual polymer chains that are associated with sodium (Na) ions—sodium alginate. This compound is what is used in the activity.
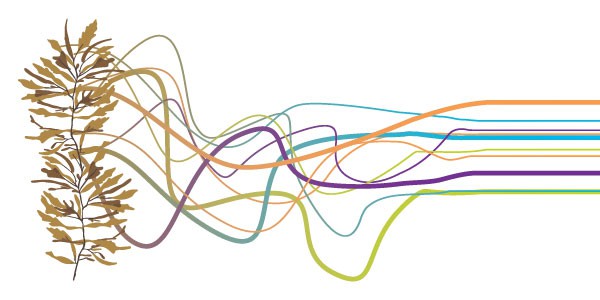
To transform sodium alginate into algae string, we will be using a chemical reaction, or a process that transforms one (or more) substances into one (or more) different substances. The specific reaction at the core of this activity is called ionic cross-linking. When a calcium solution is added to the sodium alginate, calcium (Ca) ions replace the sodium ions and start to link the alginate polymers together into a net-like structure. This happens because calcium can bind to two polymers at once. This is what transforms the gooey gel into a more solid material!
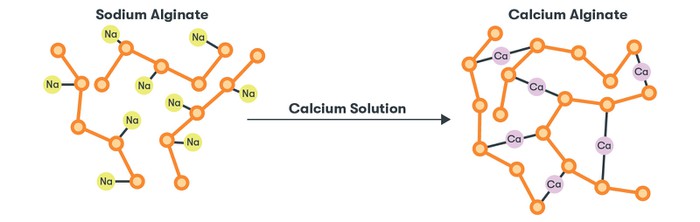 Image Credit: The Tech Museum / The Tech Interactive
Short strings of sodium alginate polymers with sodium ions attached are put in a calcium solution. A chemical reaction occurs where the sodium ions are replaced with calcium ions. Each calcium ion links two of the alginate polymers resulting in a network of polymers.
Why Algae String Matters
Most plastic products that we see every day are made from synthetic polymers. These materials have a serious environmental downside, as they are not biodegradable and frequently are synthesized from petroleum products. A need to live more sustainably on earth has motivated recent scientific and industry research into how we might leverage natural polymers instead. Algae string is a great example of a product made from a natural polymer that could maybe one day replace the synthetic fibers that harm the environment by introducing microplastics into our ecosystems.
Vocabulary
- Alginate: A flexible natural polymer found in the cell walls of large brown algae.
- Biodegradable: Something that can be decomposed by bacteria or other living organisms.
- Chemical Reaction: A process that transforms one (or more) substances into one (or more) different substances.
- Cross-linking: A chemical reaction that results in the formation of (ionic or covalent) bonds between several polymer chains, producing a network of interconnected chains.
- Extrusion: A method to shape a material by forcing it through a mold.
- Polymer: Materials made up of long chains of molecules, which can be human-made (synthetic plastics) or natural.
Resources and References
- AlgiKnit, a company creating yarns and textiles from algae
- Chemistry World Podcast: Sodium alginate by Brain Clegg, September 16, 2014
For more lesson plans, videos and other facilitation resources see thetech.org/resources.
Prep Work
Lesson Preparation
- Collect your ingredients, supplies and tools using the materials lists provided.
- We recommend sandwich-sized plastic bags as they are easy to store and reduce the amount of equipment needed to mix and extrude the string.
- Avoiding single-use plastics? Check out the Tech Interactive Algae String Tool Chest for suggestions of reusable mixing containers and string-making tools.
- Offer students at least three different texture ingredients and at least two different types of color sources (food dye and paint, or liquid and solid colors) to encourage meaningful exploration. We have included a selection of ingredients in the materials table that our scientists have tested, but these are not the only possibilities.
Important: We recommend using food grade sodium alginate and calcium chloride in case of accidental ingestion. - We recommend sandwich-sized plastic bags as they are easy to store and reduce the amount of equipment needed to mix and extrude the string.
- Prepare activity materials and set up the classroom before each lesson.
| Lesson One |
|
| Lesson Two |
|
| Lesson Three |
|
If teaching remotely, consider a combination of asynchronous and synchronous options.
- Introduce the activity asynchronously: share Make String from Algae activity and associated videos with students.
- Materials Access: Send materials kits to students so they can create algae string on their own.
- If students are unable to conduct the activity on their own, lead a live demonstration or share a video for them to review.
- Sharing Results: Have students take pictures or videos of their algae gel and string at each step in the process. They can share these via asynchronous collaborative tools and platforms (Google, Padlet, Flipgrid, etc).
- Create a shared digital spreadsheet/document where students can enter their data and observations.
For more adaptations see our Educator Tips for Remote STEM Learning.
Lesson Instructions
| Outline | |
|---|---|
| Lesson One: Plan and Prepare Algae Gel | 50 min |
| (gel rests) | 12 hrs - 3 days |
| Lesson Two: Transform Algae Gel into Solid String | 50 min |
| (string dries) | 12+ hrs |
| Lesson Three: Tie it All Together | 50 min |
Lesson One: Plan and Prepare Algae Gel
| Lesson One Outline | |
|---|---|
| Frame the Activity | 15 min total |
| Activate Prior Knowledge | 5 min |
| Introduce the Activity | 10 min |
| Prepare Algae Gel | 25 min total |
| Brainstorming | 10 min |
| Make Algae Gel | 15 min |
| Closing | 10 min total |
| Sharing | 7 min |
| Debrief | 3 min |
Frame the Activity
Activate Prior Knowledge (10 min)
- Find out what students already know about polymers and plastic. Guiding questions for student reflection or class discussion can include:
- What are the materials we use every day made out of?
- Which ones are synthetic and which ones are natural?
- How long do synthetic polymers like plastics take to break down?
- Why does that process take so long compared to natural polymers like wood?
- Why would we want to draw inspiration from the polymers that living things make?
- During the discussion, introduce the relevant vocabulary (polymer, alginate, biodegradable) and point out:
- Polymers can be natural or synthetic. Biopolymers are made by living things.
- Most synthetic polymers are not biodegradable and most frequently synthesized using petroleum products (oil), leading to negative impacts on the environment.
- Natural polymers and biopolymers are biodegradable.
- Brown algae, like kelp and seaweed, produce a natural polymer, alginate, that allows them to be strong and flexible. This is the polymer used in the activity.
- Alginate could maybe be used in the future to replace harmful synthetic polymer plastics in various manufactured products.
Wound dressings made from dried alginates are used to treat wounds on the skin that produce a lot of fluids, like ulcers. The gel formed when dry alginates absorb fluids helps the wound heal faster by forming an easy-to-change barrier that lets in air and keeps bacteria out.
In addition, there are startup companies exploring this technology as the basis for new materials and products. For example, AlgiKnit is focused on using algae polymers to produce more sustainable fibers for the fashion and textile industries.
Introduce the Activity (10 min)
- Explain the overall goals of the activity.
- Each student will design and create their own batch of colorful strings using a natural polymer made by algae (alginate) and a bit of chemistry.
Tip: Use one of The Tech Interactive at Home videos to introduce the activity. Seeing the process and final product can provide students with useful context and inspiration. - Group students into groups of 4 people.
- Students will work in groups so they can observe and compare how different ingredient choices impacted their unique algae string creations.
- Pass out the student handouts (Algae String Protocol and Data Collection Sheet).
- Highlight the areas of the data sheet that students will need to complete, including their group brainstorm and the individual choices they are making to design their algae gel.
- Introduce the essential ingredients used in this lesson (sodium alginate, water).
- These must be used in the amounts listed in the protocol.
- Introduce the exploration supplies (texture ingredients, color sources).
- These are the variables in this activity.
- Highlight that these ingredients provide opportunities for experimentation. Ingredients can be mixed and matched or even combined, so get creative!
| Exploration Supplies | |
What are texture ingredients?
|
What are color sources?
|
- Emphasize that the open-ended and creative aspects of this activity are an important part of how science is done in a working laboratory.
- This experiment, like real science, doesn't have a set outcome. Many different results can be discovered through purposeful student exploration.
Prepare Algae Gel
Students should use the Algae String Protocol and Data Collection Sheet to guide themselves through the process of creating algae gel (Steps 1-2). The lesson plan below follows the student protocol steps but contains additional teacher information and useful Technical Tips from our scientists.
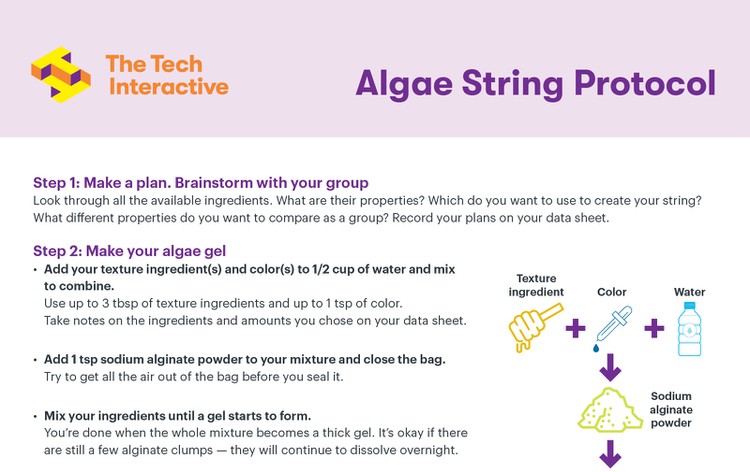 Image Credit: The Tech Museum / The Tech Interactive
Brainstorming (Student protocol: Step 1; 10 min)
- Student groups should work together to create an algae string ingredient strategy.
- Each student will create their own algae string, but they can share ideas and get inspiration from the other members of their group.
- For example, each student in one group may decide to try to create a blue string using different color and texture ingredients.
- Have students brainstorm which string properties and ingredients they can explore:
- Which string texture/color source(s) to use.
- How much of each ingredient to add.
- What color their final gel creation will be.
- How flexible and thick they want their string to be.
- Allow students to explore the buffet of texture ingredients and color sources as they work.
- Color, texture, or even smell can help inform student brainstorming and decision making.
- Encourage creative approaches, such as mixing multiple texture or color options.
- While groups are working, use open-ended questions to guide their thinking:
- What experience have you had with these ingredients in the past?
- What look and feel properties are you trying to achieve in your dried string?
- How will your texture ingredient(s) impact the color of your creation?
A systematic exploration can be embedded in this activity by having students define a control variable (amount of texture ingredient, color source, or reaction time) and the other variables they will change. Different groups can coordinate to test a range of variables and share out their findings to create an understanding of how to make a string with specific properties.
Make Algae Gel (Student protocol: Step 2; 15 min)
- Have students label their bags with a permanent marker (student name) and add ingredient notes (optional).
- Each student should combine their ingredients in a plastic bag in the order listed in the student protocol. The base recipe for an individual student batch is listed in the table below.
| Base Recipe per student | |
|---|---|
| Ingredient | Amount |
| Water (bottled or filtered) | 1/2 cup |
| Texture ingredient(s) | 1-3 tbsp total |
| Color source(s) | Up to 1 tsp |
| Sodium alginate powder | 1 tsp |
- Have students seal the bags tightly and mix everything by squishing the bag until a gel starts to form. It is okay if there are still some clumps of alginate powder in the gel.
- Removing as much air as possible before sealing makes mixing easier.
- Make sure students record their choices and observations on their data collection sheet.
Focus on structure and properties of matter. Students can feel and observe the changes in their algae gel and use the ingredients to investigate the changes when two or more substances are mixed. Have them consider:
- What can cause something to change from a liquid to a solid?
- Is this gel a liquid or a solid? Why do you think so?
Closing
Sharing (7 min)
- Have students share their algae gels.
- Keep sharing focused on why they chose specific ingredients and what outcomes their group wants to explore or compare.
- Sharing options include:
- Stand and share: Call on groups or students to share with the larger class.
- Closing circle: Each student shares one decision they made and why.
- Networking: Set a timer and have students mingle and talk to at least three different people in three minutes.
Debrief (3 min)
- In the time remaining, debrief with the larger class about the experience and what they should expect in the next lesson. Debrief questions can include:
- How will your algae gel need to change in order to make "string"?
- Can you see the impact of all your ingredient choices on your gel?
- Which ones are most obvious?
- What observations might need to wait until later stages of the activity?
Clean up: Lay or stack the bags of gel on a flat surface (on a shelf or inside a box) with the gel equally distributed throughout the bag.
Technical Tip: Remind students to make sure any remaining alginate clumps are touching the gel, otherwise they may not finish dissolving overnight.
Timing Tip: We recommend letting the algae gel sit overnight, but if necessary the gel can sit for up to three days before Lesson Two. If sitting for a longer time, it is best to refrigerate the algae gel and keep an eye out for any mold growth.
Lesson Two: Transform Algae Gel Into Solid String
| Lesson Two Outline | |
|---|---|
| Frame the Activity | 8 min total |
| Activate Prior Knowledge | 5 min |
| Introduce the Activity | 3 min |
| Create Algae String | 25 min total |
| Prepare Calcium Bath | 5 min |
| Extrude Algae String | 20 min |
| Closing | 17 min total |
| Share String Creations | 10 min |
| Debrief | 7 min |
Preparation Reminder
- Refer back to the Materials and Preparation sections for the details on supplies.
- In addition to preparing for students to mix their calcium baths, plan a process for drying and storing the completed strings.
Frame the Activity
Activate Prior Knowledge (5 min)
- Recap what happened in Lesson One and remind students of the previous vocabulary.
- The algae gel contains mostly alginate, which is a natural polymer harvested from seaweed that is biodegradable.
- It was customized based on the exploration supplies students used and in what quantities.
- Invite students to discuss their decision points from Lesson One.
- Which ingredients did you choose when making your algae gel?
- What do you predict your algae string will look and feel like because of these ingredients?
Introduce the Lesson (3 min)
- Provide an overview of the process that students will do today using their algae gel.
- By squeezing the algae gel into a calcium bath, we can start a chemical reaction that will transform your algae gel into a solid string.
- Introduce the relevant vocabulary (chemical reaction, cross-linking, extrusion) and connect it to the the steps in the experiment by pointing out:
- We will be using a chemical reaction to convert gooey algae gel into algae string!
- The essential ingredients in the chemical reaction are sodium alginate and calcium chloride.
- This specific type of reaction is called ionic cross-linking. Calcium ions from the bath will link together alginate polymers in your gel to create a net-like structure.
- To shape the gel prior to it becoming solid, we will use a technique called extrusion—squeezing our gel out of a hole in our bags.
Have students draw a simple model of the chemical structures before and after the chemical reaction.
Create Algae String
Students should use the Algae String Protocol and Data Collection Sheet to guide themselves through the process of creating algae string (Steps 3-5). The lesson plan below follows the student protocol steps but contains additional teacher information and useful Technical Tips from our scientists.
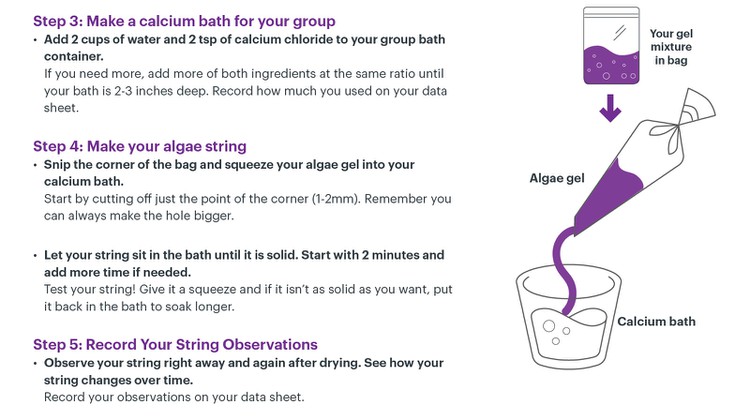 Image Credit: The Tech Museum / The Tech Interactive
Prepare Group Calcium Bath (Student protocol: Step 3; 5 min)
- Students should collect their algae gel and return to their groups from Lesson One.
- Have them observe and take notes on any changes that have occurred in their algae gel.
- Next, each group should make one calcium bath to share in a container with a wide opening.
- The base recipe for a group batch is listed in the table below.
Ingredient Amount Water (any type) 2 cups Calcium chloride 2 tsp
- If students need to make more, add both ingredients at the same ratio (1 tsp calcium chloride per 1 cup of water) until the bath is deep enough (approximately 2-3 inches).
- The base recipe for a group batch is listed in the table below.
Extrude Algae String (Student protocol: Step 4-5; 20 min)
- Students can transform their bag into a string-making tool by cutting a small hole in one of the bottom (non-zipper) corners.
- The size of the hole will affect the diameter of the string. Remind students to start by making a very small hole (1-2mm), as it is always possible to enlarge it later.
Technical Tip: Constantly moving the bag over the bath during extrusion will help keep the string from sticking together. Do not submerge the bag while extruding, as the alginate will solidify in the opening and cause it to clog.Adaptation for Advanced ScientistsStudents can experiment with different extrusion methods. Options include squeeze bottles, cups, piping bags, syringes (without a needle).
- Have students split one batch of algae gel into multiple tools to extrude their string to explore how different methods change their final product.
Give students clear goals that depend on extrusion technique, using questions like:
- What is the longest piece of string you can make?
- Can you extrude all of your gel in one piece?
- What is the thickest string you can make?
- One at a time students should extrude the gel into the calcium bath. They do this by holding the algae gel a few inches above the calcium bath and squeezing.
- Students should leave their strings in the bath for a few minutes.
- Encourage students to test their string multiple times while in the calcium bath by squeezing it and make notes about how the string feels.
Technical Tip: The strings solidify from the outside-in, as the calcium will take time to diffuse to the center of the string. Students who extrude thicker strings will need to leave their string in the bath for more time. - Students should record observations of the properties of their strings at this stage of the process.
- These can include features like length, width, flexibility, texture, color, etc.
Closing
Share String Creations (10 min)
- Have students share their strings with the whole class.
- Options for sharing:
- Textile gallery walk: Students lay out their strings and walk around the room examining each other's creations. They can gently touch and explore the properties of other strings.
- Stand and share: Individuals or groups hold up their string and talk about their process.
- Sharing questions can include:
- Can you observe any of the effects of your ingredients (texture or color) on your string?
- How do your strings compare? What differences can you identify at this stage?
- Was anything challenging about the extrusion process? What would you do differently next time?
Technical Tip: Assist the drying process by having students straighten out their strings rather than placing the string in piles and using a fan (optional).
Debrief (7 min)
- Lead a short debrief with the larger class about the experience. Debrief questions can include:
- What changes did you notice while your string was in the bath?
- What happens in the chemical reaction that links the alginate polymers together?
- Are the color or texture ingredients involved in the cross-linking reaction?
- What do you hypothesize will happen as your strings dry? How will their properties change?
Lesson Three: Tie It All Together
| Lesson Three Outline | |
|---|---|
| Frame the Activity | 8 min total |
| Activate Prior Knowledge | 5 min |
| Introduce the Lesson | 3 min |
| Dried String Observations | 22 min total |
| Observations | 5 min |
| Make And Explore with String | 17 min |
| Closing | 20 min total |
| Share String Creations | 10 min |
| Debrief | 10 min |
Preparation Reminder
- Prior to the lesson, check on the progress of the drying strings.
- Refer back to the Materials and Preparation sections at the beginning of this guide for the details on supplies.
- Decide on a process for group sharing during this final lesson.
Frame the Activity
Activate Prior Knowledge (5 min)
- In this lesson, students will get to see the outcomes of their experimentation by exploring the properties of their final product—the dried algae string.
- Begin by reflecting on the previous lessons and the decisions students made during extrusion.
- Have students hypothesize the properties of their dried algae string.
- What do you think your dried algae string will look and feel like?
- What hypotheses do you have about the way your string might be different from others in your group?
- In addition, have students reflect on why their dried string might differ from the wet string they explored in the previous lesson. Students may notice:
- The effects of texture ingredients are often only visible in the dried string, where they change the smoothness and suppleness of the final product.
- The water trapped inside the alginate polymers has had time to evaporate, leaving behind a smaller string made of alginate polymers and any additional texture or color sources.
Introduce the Lesson (3 min)
- Explain that, during the first part of the lesson, students will observe and share their dried string with each other.
- Then they will have a chance to work together as a group to try to create something unique with their strings.
- As a final step they will share their string creations with the class and summarize what they noticed about how their string's properties were affected by their decisions.
Dried String Explorations
Observations (Student protocol: Step 5; 5 min)
- Have students collect their dried string and return to their previous groups.
- Students should observe how their string has changed since the last lesson.
- Encourage students to pay close attention to the material properties of their string, including the flexibility, color, size, sheen, smell, or stickiness of the final product.
- Encourage individual string observations with questions such as:
- Can you observe anything inside your string?
- Is your string the same texture throughout? What might have caused any variation?
- What properties does your string have that are similar to the ingredients you used?
- Encourage groups to compare and contrast their strings with questions such as:
- How do your strings compare now that they have dried? What properties are similar or different?
- Do all your dried strings look and feel like you expected them to?
- Can you identify any differences in your strings that are a result of choices made during the extrusion process?
- Have students record their new observations in their Data Collection Sheets.
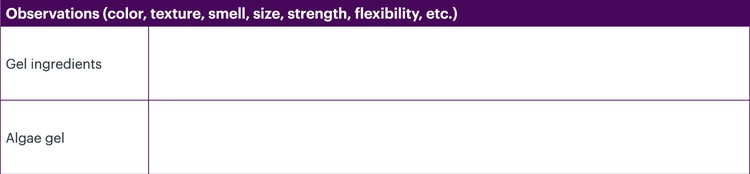 Image Credit: The Tech Museum / The Tech Interactive
Make and Explore with String (17 min)
- Next, students will explore the properties of their algae string and its creative applications.
- In their small groups, students should combine their strings to create one unique item.
- In addition to exploring the properties of the string, students should be considering the real-world applications of their string.
- As they have a small amount, they may need to focus on creating a sample, or model, of a larger idea.
- If students need some inspiration, brainstorm some ideas as class. Their list may include:
- Arranging their strings in a shape or picture on paper.
- Adapting simple fiber arts techniques, including braiding, square knot/boondoggle keychains, or knotted friendship bracelets.
- Creating small objects like nets or hammocks.
- Exploring traditional fiber processing by winding the string into balls or twining strands together into a rope.
- Ideas inspired by the real-world examples in the Resources.
- If students finish early, have them look at the sharing questions in the next section and think about what they will say about their process and their string creations.
With algae string, your students can use science as the basis for the art of storytelling.
- Fiber arts, particularly weaving, have been used as a method of storytelling for centuries. Have students look at some historical, cultural or literary examples of this technique.
- Have students use their algae string to make a creation that tells a story.
- Have them consider: How does the scientific source change the stories you want to tell?
Closing
Share String Creations (10 min)
- Have each group share their dried string creations with the larger class.
- Sharing solutions is an important way for students to celebrate and process their work.
- Encourage students to give each other positive feedback on their creations.
- Options for sharing:
- Gallery walk: Students answer the questions on note cards or paper. They then lay out their string creations on a table and walk around the room examining each other's creations. As they were working in groups, team members can take turns presenting and viewing.
- Stand and share: Students hold up their algae string and talk about their process.
- Sharing questions can include:
- What did you make and why?
- How did the properties of your strings influence what you decided to make with them?
- Did you notice any dried string properties that were particularly valuable or interesting?
- What would you do differently next time?
Debrief (10 min)
- Lead a debrief with the class focused on how student ingredient choices in Lesson One impacted their final dried string products. Debrief questions can include:
- Were observations about the impact of ingredient choices similar or different between groups? Why might that be?
- Are there other experiments you could do to help you make better conclusions about the effects of the ingredients you chose?
- What advice would you give future students about choosing ingredients?
- Help students make connections between the chemistry showcased in this activity and broader content concepts. Debrief questions can include:
- How do you think products made from dried algae string or other natural polymers could be useful in the real world?
- Can you think of any interesting uses for the "wet" algae string material?
- What are some advantages or disadvantages of using these kinds of biopolymers as alternatives to polymers synthesized from petroleum products?
- How might these new materials impact society as a whole?
Assessment
Authentic assessment opportunities help students make connections between what they are learning and how those skills may be useful in a future situation or even in a career.
 Image Credit: The Tech Museum / The Tech Interactive
This activity was developed by The Tech Interactive with funding from a Science Education Partnership Award (SEPA) from the National Institute of General Medical Sciences (NIGMS) at the National Institutes of Health (NIH).